Learn controlling LED Lights on a webserver using NodeMCU
- EmbeddedBrew
- Jul 5, 2024
- 3 min read
In this tutorial, we'll show you how to control an LED connected to a NodeMCU via a web server. This project is a great way to get started with IoT and learn how to integrate hardware with web technology.
Requirements
- NodeMCU (ESP8266)
- LED
- 220Ω resistor
- Breadboard and jumper wires
- Micro USB cable
- Arduino IDE installed on your computer
Step 1: Setting Up the Hardware
1. Connect the LED to the NodeMCU:
- Place the LED on the breadboard.
- Connect the longer leg (anode) of the LED to a digital pin on the NodeMCU (e.g., D1).
- Connect the shorter leg (cathode) of the LED to one end of the resistor.
- Connect the other end of the resistor to the GND pin of the NodeMCU.
Step 2: Preparing the Arduino IDE
1. Install the ESP8266 Board:
- Open the Arduino IDE.
- Go to `File` -> `Preferences`.
- In the "Additional Boards Manager URLs" field, add this URL: `http://arduino.esp8266.com/stable/package_esp8266com_index.json`.
- Go to `Tools` -> `Board` -> `Boards Manager`.
- Search for "ESP8266" and install the "ESP8266 by ESP8266 Community" package.
2. Select the NodeMCU Board:
- Go to `Tools` -> `Board` -> `ESP8266 Boards` -> `NodeMCU 1.0 (ESP-12E Module)`.
Step 3: Writing the Code
1. Open a New Sketch:
- In the Arduino IDE, open a new sketch (`File` -> `New`).
2. Include Required Libraries and Define Variables.
#include <ESP8266WiFi.h>
#include<SoftwareSerial.h>
const char* ssid = "RDC A3";
const char* password = "Rudraiot";
int ledPin = LED_BUILTIN ; // GPIO13---D7 of NodeMCU
WiFiServer server(80);
void setup() {
 Serial.begin(115200);
 delay(10);
 pinMode(ledPin, OUTPUT);
 digitalWrite(ledPin, LOW);
 // Connect to WiFi network
 Serial.println();
 Serial.println();
 Serial.print("Connecting to ");
 Serial.println(ssid);
 WiFi.begin(ssid, password);
 while (WiFi.status() != WL_CONNECTED) {
 delay(500);
 Serial.print(".");
 }
 Serial.println("");
 Serial.println("WiFi connected");
 // Start the server
 server.begin();
 Serial.println("Server started");
 // Print the IP address
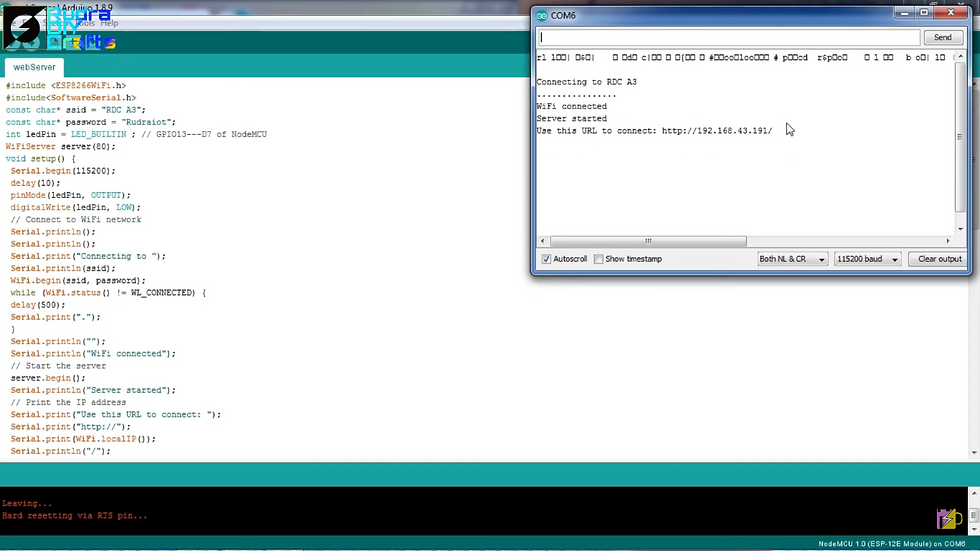
 Serial.print("Use this URL to connect: ");
 Serial.print("http://");
 Serial.print(WiFi.localIP());
 Serial.println("/");
}
void loop() {
 // Check if a client has connected
 WiFiClient client = server.available();
 if (!client) {
 return;
 }
 // Wait until the client sends some data
 Serial.println("new client");
 while(!client.available()){
 delay(1);
 }
 // Read the first line of the request
 String request = client.readStringUntil('\r');
 Serial.println(request);
 client.flush();
 // Match the request
 int value = HIGH;
 if (request.indexOf("/LED=ON") != -1) {
 digitalWrite(ledPin, HIGH);
 value = LOW;
 }
 if (request.indexOf("/LED=OFF") != -1) {
 digitalWrite(ledPin, LOW);
 value = HIGH;
 }
// Set ledPin according to the request
//digitalWrite(ledPin, value);
 // Return the response
 client.println("HTTP/1.1 200 OK");
 client.println("Content-Type: text/html");
 client.println(""); // do not forget this one
 client.println("<!DOCTYPE HTML>");
 client.println("<html>");
 client.print("Led is now: ");
 if(value == HIGH) {
 client.print("On");
 } else {
 client.print("Off");
 }
 client.println("<br><br>");
 client.println("<a href=\"/LED=ON\"\"><button>OFF </button></a>");
 client.println("<a href=\"/LED=OFF\"\"><button>ON </button></a><br />");
 client.println("</html>");
 delay(1);
 Serial.println("Client disonnected") ;
 Serial.println("");
}Step 4: Uploading the Code
1. Connect Your NodeMCU to Your Computer:
- Use the micro USB cable to connect the NodeMCU to your computer.
2. Upload the Code:
- In the Arduino IDE, select the correct port under `Tools` -> `Port`.
- Click on the upload button to compile and upload the code to the NodeMCU.
Step 5: Testing Your Web Server
1. Find Your NodeMCU's IP Address:
- Open the Serial Monitor (`Tools` -> `Serial Monitor`).
- Look for the IP address assigned to your NodeMCU in the output.

2. Control the LED:
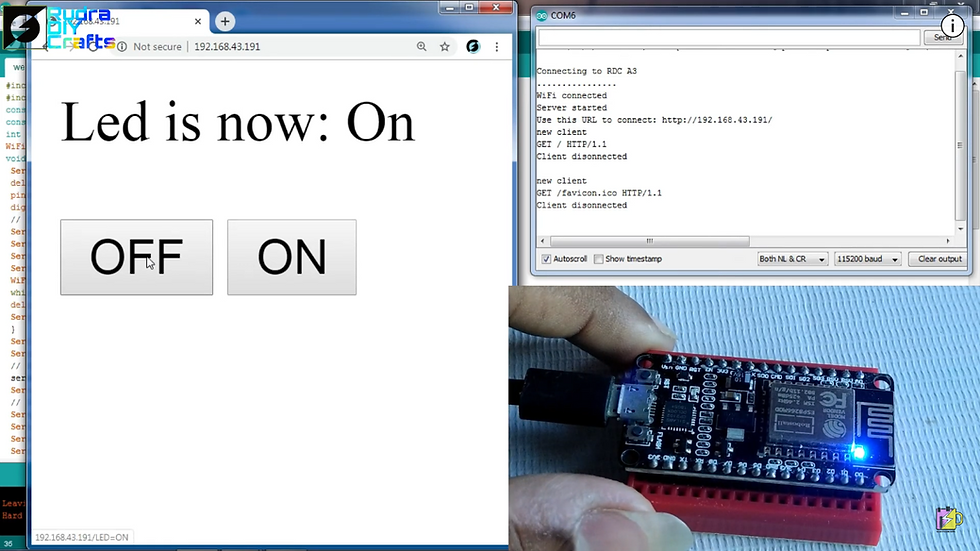
- Open a web browser and enter the IP address of your NodeMCU.
- You should see a simple web page with buttons to turn the LED ON and OFF.


Conclusion
You have now successfully set up a web server using NodeMCU to control an LED. This project is a foundational step into the world of IoT, allowing you to control devices over the internet. Experiment with different components and expand your project to create more complex IoT systems. Also checkout more projects on our website and enhance your skills at Skill-Hub by EmbeddedBrew.


Comments