Getting Started with ESP32 Cam Module and Solve Fatal Error
In this Project we will learn about ESP32 Cam module & create a Live Security Camera
Description:
The ESP32-CAM is a powerful and versatile microcontroller with built-in Wi-Fi and Bluetooth, making it ideal for various IoT projects. Here’s a step-by-step guide to help you get started with your ESP32-CAM on a Windows PC.
Step 1: Gather Your Components
Before you begin, ensure you have the following components:
- ESP32-CAM module
- USB to TTL/Serial adapter (such as FTDI or CP2102)
- Jumper wires
- Breadboard (optional)
- Micro USB cable
Step 2: Install Arduino IDE
1. Download Arduino IDE: Visit the [Arduino IDE download page](https://www.arduino.cc/en/software) and download the Windows installer.
2. Install Arduino IDE: Run the installer and follow the on-screen instructions to install the IDE on your PC.
Step 3: Install ESP32 Board Support
1. Open Arduino IDE: Launch the Arduino IDE.
2. Open Preferences: Go to `File` > `Preferences`.
3. Add ESP32 URL: In the "Additional Board Manager URLs" field, enter the following URL: `https://dl.espressif.com/dl/package_esp32_index.json`
4. Open Boards Manager: Go to `Tools` > `Board` > `Boards Manager`.
5. Install ESP32: In the Boards Manager window, search for "ESP32" and click "Install" on the "esp32 by Espressif Systems" entry.
Step 4: Set Up ESP32-CAM in Arduino IDE
1. Select Board: Go to `Tools` > `Board` and select `AI Thinker ESP32-CAM`.
2. Select Port: Connect your USB to TTL adapter to your PC and select the appropriate COM port under `Tools` > `Port`.
Step 5: Wiring the ESP32-CAM
1. Connect the ESP32-CAM to the USB to TTL Adapter:
- ESP32-CAM | USB to TTL
- 5V | 5V
- GND | GND
- U0R | TX
- U0T | RX
- IO0 | GND (for programming mode)
Step 6: Uploading the Code
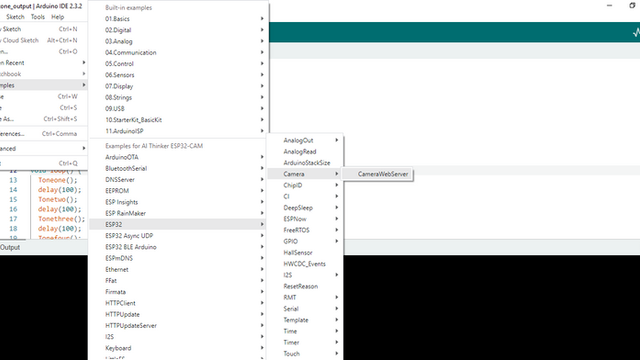
1. Open Example Sketch: Go to `File` > `Examples` > `ESP32` > `Camera` > `CameraWebServer`.
2. Modify the Sketch: Find the following lines in the sketch and update them with your Wi-Fi credentials:
const char* ssid = "your-SSID";
const char* password = "your-PASSWORD";
3. Select Board Settings: Ensure the following settings are selected:
- Board: `AI Thinker ESP32-CAM`
- Flash Mode: `QIO`
- Flash Frequency: `40MHz`
- Partition Scheme: `Huge APP (3MB No OTA)`
- Upload Speed: `115200`
4. Upload Code: Click the upload button. While uploading, press and hold the `RESET` button on the ESP32-CAM.
Step 7: Running the ESP32-CAM
1. Open Serial Monitor: Go to `Tools` > `Serial Monitor` and set the baud rate to `115200`.
2. Reset the ESP32-CAM: Disconnect the IO0 pin from GND and press the `RESET` button on the ESP32-CAM.
3. View Output: The Serial Monitor will display the IP address of your ESP32-CAM.
4. Access the Web Server: Open a web browser and enter the IP address displayed in the Serial Monitor. You should see the camera feed from your ESP32-CAM.
Project Gallery
All Documents :
Copy & Paste this link in ArduinoIDE - File - Preferences - Additional Boards Manager URL -
https://dl.espressif.com/dl/package_esp32_index.jsonUse the example code as instructed in the Video
Click Here to Download
Video Tutorial :
Conclusion :
Congratulations on completing all the steps! You now have a solid understanding of how the Raspberry Pi Pico works. Feel free to experiment with various projects to further enhance your skills. For more project ideas and detailed guides, visit our website. Additionally, explore Skill-Hub by EmbeddedBrew to acquire a wide range of skills in embedded systems. Happy Learning!


